Battery switch on travel trailer function is crucial for managing your RV’s power. Understanding how to use and maintain your battery switch is key to preventing dead batteries and ensuring you have power when you need it, whether you’re boondocking or hooked up to shore power. This guide breaks down everything you need to know, from basic operation to troubleshooting and safety.
We’ll cover different types of switches, wiring diagrams, troubleshooting common issues, and essential safety precautions. We’ll also explore how your battery switch interacts with solar panels and other power sources, helping you maximize your RV’s energy efficiency. Get ready to become a battery switch pro!
Understanding Battery Switch Functionality in Travel Trailers: Battery Switch On Travel Trailer Function
Your travel trailer’s battery switch is a crucial component, managing power flow between your house batteries (powering lights, appliances, etc.) and your starting battery (for the engine). Understanding its function ensures safe and efficient use of your RV’s power systems.
Types of Battery Switches
Travel trailers typically utilize one of two main types of battery switches: a simple on/off switch or a more sophisticated multi-position switch. A simple on/off switch allows you to disconnect both batteries completely from the trailer’s electrical system. This is useful for preventing parasitic drain when the trailer is stored for extended periods. Multi-position switches, often rotary switches, offer more control.
They usually include positions for “Both,” “Start,” “House,” and “Off.” “Both” connects both batteries in parallel, providing maximum power. “Start” connects only the starting battery, while “House” connects only the house batteries. “Off” disconnects both.
So, you’re planning a trip? Awesome! First things first, grab some peace of mind by sorting out travel insurance. Check out Aon travel insurance for options; they’ve got you covered. Then, if you’re hitting the road in an RV, knowing how the battery switch on travel trailer function works is key to avoiding a dead battery and a ruined vacation.
Get familiar with that before you go!
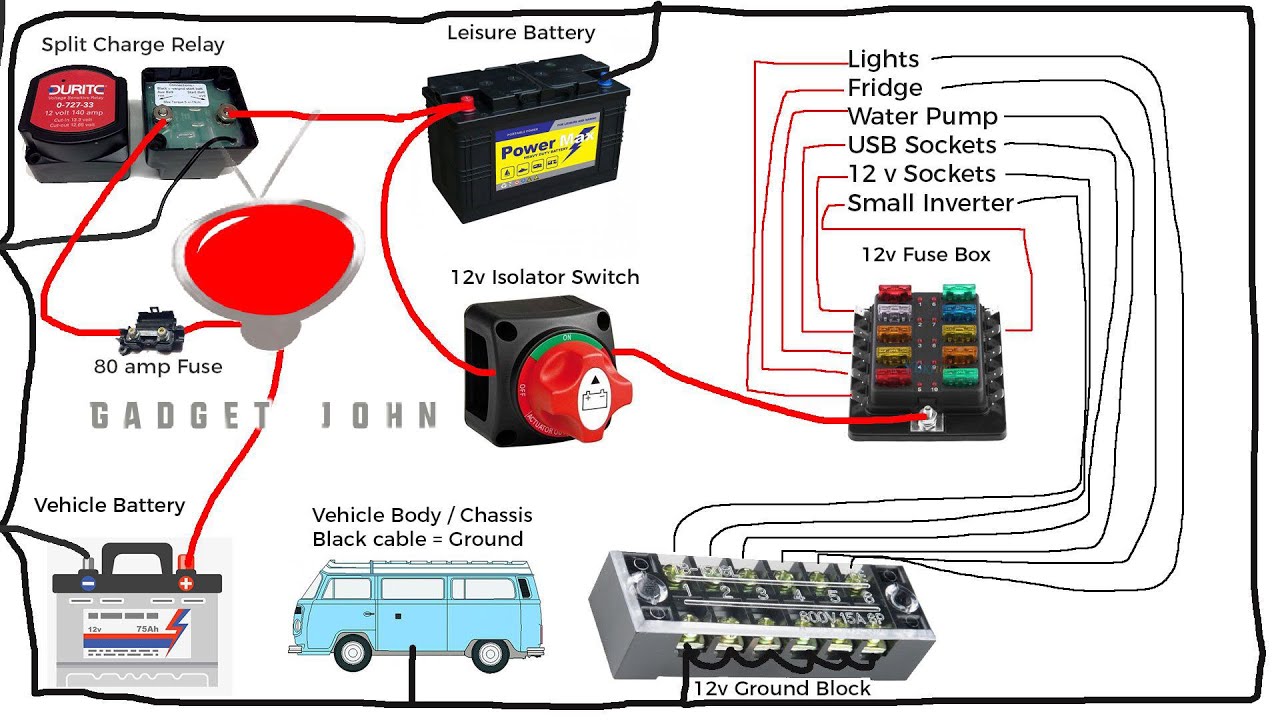
Typical Wiring Diagrams for Battery Switch Setup
A standard setup involves a single battery switch connected to both the starting and house battery banks. The positive cables from each battery connect to the switch. The output of the switch then feeds the positive bus bar supplying power to the trailer’s 12V system. Negative cables from each battery usually connect directly to the chassis of the trailer, forming a ground.
More complex systems may incorporate additional switches or relays for managing solar panels, chargers, or other power sources. Imagine a diagram: The switch is depicted as a central component with two inputs (positive cables from the starting and house batteries) and one output (leading to the positive bus bar). Each input and output is clearly labeled.
The negative cables are shown connected directly to the trailer’s frame.
Switching Between Batteries
Switching between your starting and house batteries involves using the rotary switch on your battery switch panel. The process is straightforward, but understanding the positions is key. Before making any changes, familiarize yourself with the switch’s markings.
So, you’re planning a trip? Awesome! First things first: get travel insurance. Check out Aon travel insurance for options; they’ve got you covered for most eventualities. Then, if you’re hitting the road in an RV, knowing how to use your battery switch on travel trailer function is crucial. It’s a simple thing, but understanding it can save you a lot of headaches (and dead batteries!) on the road.
Make sure you’re prepared before you leave!
Step-by-Step Guide to Using a Battery Switch, Battery switch on travel trailer function
1. Identify the Switch Positions
Locate the battery switch panel, typically near the batteries themselves. Confirm the labels for “Both,” “Start,” “House,” and “Off.”
2. Starting the Engine
To start your trailer’s engine, ensure the switch is in the “Start” position or “Both” position. This ensures the engine’s starting battery has sufficient power.
3. Running Appliances
For running appliances and lights within your trailer, use the “Both” or “House” position. “Both” provides the maximum power available from both batteries, while “House” only uses your house batteries.
4. Disconnecting Batteries
When storing your trailer for a longer duration, switch to the “Off” position to disconnect both batteries completely, preventing unwanted drain and potential damage.
5. Regular Checks
Periodically check the battery switch to ensure it remains securely in the desired position and that there are no signs of damage or corrosion.
Safety Precautions When Using a Battery Switch
Working with batteries and the electrical systems in your travel trailer can be hazardous if proper safety measures aren’t followed. Improper handling can lead to serious injury from electric shock, burns, or even explosions. Understanding and adhering to safety protocols is crucial for preventing accidents and ensuring a safe RVing experience.
Battery switches, while seemingly simple devices, are part of a complex electrical system. Any work involving the battery switch, including installation, maintenance, or troubleshooting, requires careful attention to safety. Ignoring these precautions can lead to damage to your RV’s electrical system, injury to yourself, or even a fire.
Battery Switch Safety Hazards
Working with 12-volt batteries presents several hazards. These include the risk of electric shock, which can be particularly dangerous in damp environments. Batteries also produce flammable hydrogen gas during charging and discharging, making sparks and open flames extremely hazardous. Furthermore, battery acid is corrosive and can cause severe burns to skin and eyes. Improper handling can lead to battery acid spills or even battery explosions in extreme cases.
Safety Precautions for Battery Switch Use
Before working on your battery switch or any part of your RV’s electrical system, always disconnect the negative (-) battery terminal first. This helps prevent accidental short circuits. Wear appropriate safety gear, including safety glasses to protect your eyes from potential splashes of battery acid and gloves to protect your hands. Ensure adequate ventilation in the area where you are working, as hydrogen gas is lighter than air and can accumulate in poorly ventilated spaces.
Always have a fire extinguisher readily available, and know how to use it. Never smoke near batteries or while working with the electrical system. When cleaning battery terminals, use a wire brush and baking soda solution to neutralize any acid residue. Avoid using water directly as it can cause corrosion. Finally, consult your RV’s owner’s manual for specific safety instructions regarding your battery switch and electrical system.
Safety Measures for Different Battery Switch Types
| Switch Type | Safety Measure 1 | Safety Measure 2 | Safety Measure 3 |
|---|---|---|---|
| Standard Rotary Switch | Disconnect negative (-) battery terminal before working on the switch. | Wear safety glasses and gloves. | Ensure adequate ventilation. |
| Perko Switch | Disconnect negative (-) battery terminal before working on the switch. | Use insulated tools to avoid accidental short circuits. | Inspect switch for any signs of damage or corrosion before use. |
| Automatic Battery Switch | Familiarize yourself with the switch’s operating instructions before use. | Regularly inspect connections for corrosion. | Consult your RV’s owner’s manual for specific safety recommendations. |
| Remote Battery Switch | Use the remote switch to safely disconnect the battery from the system when not in use. | Visually inspect the wiring connections regularly for damage. | Avoid operating the switch in wet conditions. |
Different Battery Switch Configurations

Choosing the right battery switch configuration for your travel trailer is crucial for efficient power management and preventing issues down the road. The type of switch you select will directly influence how you access and utilize your battery power, affecting everything from running lights to charging devices. Let’s explore the common configurations and their implications.
Single-Battery Systems
Single-battery systems are the simplest setup. Your travel trailer uses only one battery, typically a 12-volt deep-cycle battery. This configuration is straightforward and cost-effective. Power is drawn directly from this single battery, and charging happens through the trailer’s charging system or a shore power connection.
Dual-Battery Systems with a Battery Switch
Dual-battery systems offer significantly more power capacity compared to single-battery setups. They typically involve two 12-volt deep-cycle batteries wired in parallel or series, depending on the voltage requirements of your appliances. A manual or automatic battery switch allows you to select which battery (or both) powers your trailer’s 12-volt system. This allows for longer off-grid use and provides redundancy in case one battery fails.
Automatic Switching Systems
Automatic switching systems take the guesswork out of battery management. These systems intelligently switch between batteries based on their charge levels or the power demand. They typically prioritize one battery for essential loads, preserving the other for later use. Some advanced systems even incorporate solar panel charging and charge balancing between the batteries.
Comparison of Battery Switch Configurations
| System Type | Features | Advantages | Disadvantages |
|---|---|---|---|
| Single-Battery | One 12V deep-cycle battery, direct power draw. | Simple, inexpensive, easy to install. | Limited power capacity, no redundancy. |
| Dual-Battery with Manual Switch | Two 12V deep-cycle batteries, manual switch to select battery source. | Increased power capacity, redundancy, allows for prioritizing battery usage. | Requires manual operation of the switch, potential for user error. |
| Dual-Battery with Automatic Switch | Two 12V deep-cycle batteries, automatic switching based on charge level or demand. | Increased power capacity, redundancy, automated management, prevents accidental battery drain. | More complex and expensive than manual systems. |
Mastering your travel trailer’s battery switch is a game-changer for any RVer. From preventing frustrating power outages to maximizing your solar power potential, understanding its function and maintenance is essential for a smooth and enjoyable RV experience. Remember to always prioritize safety, and don’t hesitate to consult a professional if you encounter any issues you can’t resolve. Happy travels!
Top FAQs
What happens if my battery switch is faulty?
A faulty switch can lead to power loss, inability to switch between batteries, or even damage to your electrical system. Symptoms include flickering lights, dead batteries, or no power at all.
How often should I inspect my battery switch?
At least annually, or more frequently if you notice any problems. Look for corrosion, loose connections, or damage to the switch itself.
Can I use a battery switch with lithium batteries?
Some battery switches are compatible with lithium batteries, but others are not. Always check the manufacturer’s specifications to ensure compatibility.
What type of battery switch is best for my travel trailer?
The best type depends on your power needs and budget. A simple single-battery switch is sufficient for some, while others may need a dual-battery setup or an automatic switching system.
